Thursday, 29 September 2011

NOTD;; Arrowheads and Fairy Dust! ♥♥

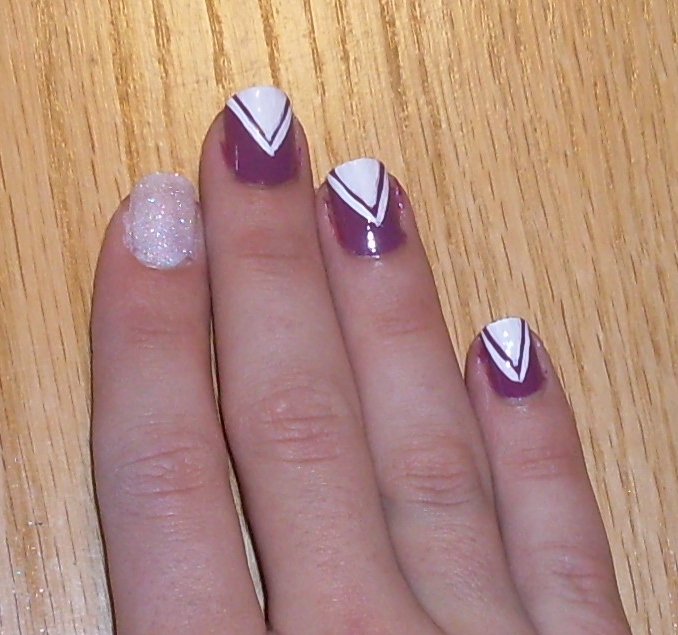
Hey guys! I did a redo of my popular arrowhead nails from way back in July, but I put a few twists on them, because I'm not one to repeat myself (: Check it out!


I did the glitter on my pointer finger for a youtube video that's uploading while I type this, and I couldn't bring myself to take it off lol! Here's the breakdown:

- OPI Nail Polish in Pamplona Purple
- Orly Instant Artist Nail Polish in Crisp White
- Pointer finger - Coastal Scents glitter in 004 Fairy Dust

I WISH this glitter would show up as amazing as it is in real life, but alas, my camera is old and lame. It's a white base with rainbow glitter. You'll just have to trust me when I say it's SUPER glittery and gorgeous!

Thanks for checking in ladies and gent(s), be sure to follow, like my facebook and check out my youtube videos!

Much love!
Dylan ♥♥

Wednesday, 28 September 2011

Let's Play Dressup! It's Halloween Time! ♥♥

What will YOU be for Halloween?

Me, I've got two costumes planned, one made already, one I need to go shopping for.

The one costume I've made is going to be Dr. Jekyll and Mr. Hyde. I made my jacket, vest, cravat, and altered a pair of pants.  I wish I had taken pictures, but it is already on display at work (I work in a fabric store, we have the option of making displays once a month that we get to keep). The entire costume is half and half, split right down the middle, makeup, nails, hair and all! I plan on making a makeup and nail tutorial for this, it's gonna be pretty intense. 


My second costume is a collaboration with my dear friend, Becky. I'm going to be Duckie, and she's going to be Andie, from Pretty in Pink. If you don't know this movie, you need to look into the Rat Pack already, it's a classic. I'm so, so excited for this! The hard part will be finding the iconic Duckie shoes...

Awesome, right? I think I'm going to take a pair of white slip ons and just draw things on them to make them look Duckie-esque. I am on a budget you know! =P


So tell me, what are YOU going to be? Scary witch doctor? Sailor Moon? Murderous clown? The possibilities are endless! Let me know in the comments and leave a picture if you can, I'd love to see! Thanks for reading, be sure to follow and subscribe to my youtube channel for upcoming halloween tutorials!


Much love and Duckie sunglasses!!

Dylan ♥♥


BIG EDIT::


I never posted a picture of my halloween costume on my blog! I totally blanked. Here's a redemption shot... I only ended up doing the Jekyll and Hyde costume,  and it was a little bit slapdash because I had to go to work, but here you go:

There you go! Sweet Redemption! Loveyoubye! ♥♥

Friday, 23 September 2011

NOTD;; Thunderstruck feat. SUPER Glitter!! ♥♥

So a while back I did a big order from Coastal Scents, in which I purchased two jars of glitter, in silver holographic, one "fairy dust" (white with rainbow reflects), and since buying them I haven't used them at all! Figuring that that simply wouldn't do, I decided to take action. Here's the action I took!


I can't believe how glittery and easy the pointer finger is!
Really fun, I don't know that I've ever rocked a two tone line like that before, but I really enjoy it (: Here's the breakdown!

From left to right:

-OPI Natural Nail Base Coat
-Sally Hansen's Xtreme Wear Nail Colour in #370 Black Out
-Silkline Nail Art Polish in Yellow (No specific name)
-OPI Instant Artist Nail Polish in Crisp White
-Revlon Extra Life No Chip Top Coat
-Coastal Scents Silver Hologram Glitter Powder (1 oz jar)

For the glitter nail, all I did was swipe a quick base coat on my nails and dip them in the jar of glitter. It is messy, and you will have to tap off some excess glitter, but it's so worth the trouble. Once it was set I put 3 good coats of top coat (well spaced out over a good amount of time), but only on the glitter nail. I did so because I wanted a smoother texture and extra shine to the glitter.

I mean, look at this thing! That's no base colour, just a clear coat underneath, dipping my nail in the glitter ONCE.


AMAZING outcome, I can't wait to try the fairy dust! And this glitter is cosmetic safe as well, so you can use it on your face without worrying, you just need a sticky base.

Thanks so much for reading guys, be sure to follow for more fun times, and check out my youtube, facebook and other social outlets!

Much love!

Dylan ♥♥

Monday, 19 September 2011

Tattoos are Beauty Too! ♥♥

What do you guys think about body art? Tattoos, piercings, the lot. I think it's a wonderful medium in which to express oneself, but a lot of people think they're a waste of money, or that you'll never love one forever, so on, so forth.

I think that as long as a tattoo means something to you, it's definitely alright to get it done. Personally, I wouldn't want to get a big skull on my chest or and tribal designs on me, because they don't mean anything to me like mine do. If a tattoo means something to you that is important and relevant to your personality, then you'll never not like your piece of art.


Here's my back piece, I must say I'm in love with it in no less of a way than I did when I got it. I got the fairy first when I was younger, I think 17, and the rest done earlier this year.


I got this tattoo because filigrees are kind of my calling card, that and zebra print. I draw them everywhere, put them in so many designs, and find myself doodling curlies all the time, so why not get it tattooed on me? Plus, tiger lilies are my favourite flower. They're so strong and vibrant.


Now if you've watched closely in my videos, seen in my pictures or know me in real life, I also have six piercings on my ears, three each, and I plan on getting at least three more. I find piercings are even less to worry about than tattoos, because they can be taken out!

So what's your body art story? Do you have any? What do they mean to you? Would you ever have them taken off or covered? Tell us what you've got in the comments!

Thanks so much for reading, be sure to comment, follow, like my facebook and subscribe to my youtube!

Much love!

Dylan ♥♥

Sunday, 18 September 2011

NOTD;; Fierce Fuschias, and New Tumblr Account!! ♥♥

Hey ladies and gent(s)!

So yesterday I did that post about the dupes... today I took those nails up a notch! =P Check em out!


This was mainly just me playing around, no specific theme here (:
Now before you ask, yes, these are the same nails I used to swatch the two different colours, and I'm lazy, so I just went over the swatches. On the two left are Pulsating, and the two right are Flashbulb Fuschia. They're so close that yes, there's a bit of a difference, but I'm not too worried about it lol!
Here's the breakdown:

-OPI Natural Nail Base Coat
-Rimmel 60 Seconds Nail Polish in Pulsating (left) OPI Nail Polish in Flashbulb Fuschia (right)
-Rimmel 60 Seconds Nail Polish in Night Before
-Orly Instant Artist Nail Polish in Crisp White
-Revlon Extra Life No Chip Top Coat

I love bright colours like this on my nails, it makes me feel so empowered!

I also wanted to mention that I've started up a Tumblr account, after much convincing! Be sure to check me out there and follow so I can be on your feed there! (Also my Facebook, Youtube and Beautylish!  :P)


Thanks so much for reading, have a fiercely fuschia kinda day!

Much love!
Dylan ♥♥

Saturday, 17 September 2011

*DUPE ALERT!* OPI Flashbulb Fuschia and Rimmel 60 Seconds Pulsating! ♥♥

Hey guys! This dupe is practically bang on, and it's gonna save you some moola too! You can't lose!

I first bought Rimmel 60 Seconds nail polish in Pulsating because it was on sale and it was totally gorgeous. A few weeks later, my friend Donna gave me OPI's Flashbulb Fuschia because she had accidentally bought two or something like that, which I'm always up for! =P I took Flashbulb Fuschia home to my collection so it could make some friends, and I found that I already had its twin! Check it out!


Okay, so they're more like sisters. There are some slight differences to these polishes, but they're still extremely similar. OPI's Flashbulb Fuschia, in the light, is a little darker in tone than Pulsating, and Pulsating has more of a purple shine to it. When these polishes are in the shade, however, they're dead ringers for each other. Here's the swatch, without flash:

Left two nails are Rimmel 60 Seconds polish in Pulsating
Right two nails are OPI's Flashbulb Fuschia

And here's the swatch with flash:

Personally I like Pulsating better, just because its more dynamic with the bluish tint to it. They are both definitely gorgeous, but since Rimmel 60 seconds is about half the price of OPI polishes, I think it's definitely the winner of this dupe-off!

Thanks so much for reading, be sure to subscribe to my youtube, follow this channel and like my facebook for more fun stuff! Here's to fun fall fuschias and alliteration!

Much love,

Dylan ♥♥

Wednesday, 14 September 2011

Rivu of the Day;; Calling All Canadians! Annabelle SkinTrue Foundation ♥♥


I found out about this amazing foundation through MissCaseyB, a fellow Canadian on youtube. As soon as I saw the coverage it was giving her and her comments on it, I simply had to try it out. Since purchasing, I don't think I've used another foundation more than once or twice... this stuff really works, it's ridiculous.

So What's the Deal, Dylan?

Annabelle SkinTrue Foundation describes itself as a natural lightweight makeup that provides uniform coverage with a no-makeup feel. It has a matte finish which I love, is oil free which I love even more, fragrance free, and non-comedogenic, which I don't believe from any foundation. I purchased the shade Natural Ivory, which is a perfect match for me.

Judging a Book by its Cover

The packaging is a simple squeeze bottle, quite possibly my favourite type of packaging for foundations, because you can easily control the amount you want and it is very sanitary. The cap is also very sturdy, and clicks on firmly.

Facetime

When I first purchased this foundation, I was just using my fingers to blend it around my face, which worked just fine and blended out nicely. Since then I've turned to using a duo fibre brush, and holy crap guys, it's amazing. I just dot it around my face in the areas I most want to cover, then blend it all out. The duo fibre blends it out lightly, so it keeps the coverage in the spots you've placed it, but also delivers tone and coverage to wherever you blend it out.  This foundation boasts uniform coverage, and it totally delivers. I can even use it layered over itself for more coverage, in place of a concealer.

Wear and Tear

Used in conjunction with a primer (I use Benefit That Gal) and set with MAC Mineralized Skin Finish Natural, this foundation provides coverage and smooth looking skin for a good 8-10 hours with minimal touch ups.

Any Cons?

The smell, for one. Since it's an unscented product (Which is a pro, I feel like scented products are just putting more unneeded stuff on my skin), so it does have a bit of a makeup-y smell to it, but you don't smell it once it's on. 

The one other thing I'm not a big fan of is the colour selection. They only have 5 shades, the darkest of which is more of a tan colour. Not that great for makeup artists, but I bought three shades for my kit because I really like this product and I have a lot of white models =P


So that's it for this review! Hope it helped some of you lovely Canadians out there decide whether or not you'd like this foundation. Thanks so much for reading, please follow, subscribe to my youtube, and like on facebook for more fun stuff! :D have a fabulous day!

Much love!
Dylan  ♥♥