Saturday 31 December 2011

NYENOTD;; Fireworks Inspired Nails! ♥♥

Hey all! Pop your corks and break out the confetti,
 it's NEW YEAR'S EVE DAY!

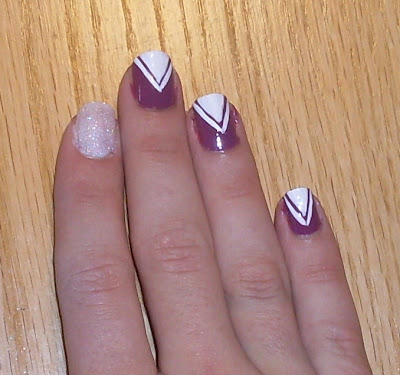
To commemorate this momentous annual occasion, I've come up with this fireworks inspired nail that is super fun, cute and celebratory! Check it out...

I love the glitter accent nail as well! And I did this all with a pencil and a flathead pin! 

Sunday 25 December 2011

Top 10 Fave Beauty Tips of 2011;; Guest Blog with Kelly from BeautyObsessed! ♥♥


Hey Everyone!!
My name is Kelly from Beauty Obsessed and my I'm super excited to be doing a guest post on Dylan's blog today.
On my blog I have a Beauty Tip of the Week feature and I thought it would be fun to pick 10 tips from over the year that I feel are the most important and make it into a post called My 10 Favorite Beauty Tips of 2011.
Some of these tips might sound wacky to you, but I promise that I would never tell you to do something that I haven't tried on myself. 

Friday 23 December 2011

NOTD;; Ugly Christmas Sweater Nails! ♥♥

Hey all! I'm so excited about this NOTD. For a few days I couldn't think of what to do on my nails! I was devoid of christmas inspiration. I was just about to go for a sub par idea that would have been cute (but not as cute as this!), but then I caught a picture of an ugly christmas sweater online, and I thought, "Hey! I can do that on my nails!"

So I did! :D Take a peek...

Super fun and festive, and it only took two nail polishes and a nifty trick with some straight pins!

Friday 16 December 2011

NOTD;; Up To My Nails in Snow! ♥♥

Tonight it began to really snow for the first time around my city! It's still not that much on the ground and it's falling really pretty, so I think it's only appropriate that I post this NOTD tonight. Check it out! (:


Some sparkly snow tipped nails for the snowy months.!

Thursday 15 December 2011

ELF Nail Polish Review! ♥♥

Hello ladies and gent(s)! I recently made an order from ELF and I've super been loving everything I've got, including these five nail polishes I got. I thought I'd show you guys the colours I got and how they apply! Here are the swatches...


Sunday 11 December 2011

Experiment Time;; Layering Nail Polishes! ♥♥

Hey all! So I was playing around with my nail polishes, deciding what to do next, when I decided to play around a bit. I painted all my nails different colours  and went over them all with the same colour to see if the polish over top would pick up on the tones of the polish underneath.

Here are the five colours I chose to layer underneath...

Saturday 10 December 2011

NOTD;; Peppermint Dreams and Guest Blog with Beauty Obsessed! ♥♥

Hey everyone! Just wanted to put this on my blog as well so others could see... I did a guest post on Beauty Obsessed (Kelly)'s blog for this nail! Take a look, and if you're into it, check out the guest post and full pictorial on Kelly's blog by clicking
  THESE WORDS RIGHT HERE!


Until next time, much love!
Dylan ♥♥

Sunday 4 December 2011

Spread the Love Sundays! Blog of the Week;; Gorgeous-Glamour! ♥♥

It's Sunday once again, folks! yes, I did miss last week, but hey, life gets the best of us all (:

This week, I'll be featuring...

Kerrie from Gorgeous-Glamour!


I'm featuring Kerrie this week because she is such a sweet, friendly person, and she really is doing it for the love, which I love to see. Plus, her hair is long, flowing and gorgeous. I remember the first time I came across Kerrie's path on Beautylish.com, and she was worried that her age might affect her success in the makeup industry, as well as the blogging/vlogging world. I am of the belief that age has no bearing on a person's success, only the drive within that person. That she continues to pursue a career in makeup artistry is attribute to her love and passion, and I find that very inspiring (:

High five girlfriend, you rock!

Be sure to check out Kerrie' blog  by clicking right here! and spread the love yourself (: 

Thanks so much for reading, hope that your week was amazing and that your next week will be filled with wonderful things!

Much love,
Dylan ♥♥

Saturday 3 December 2011

NOTD;; A Coca-Cola Christmas! ♥♥

Ohhhh, way up north, where the air gets cold, 
there's a tale about Christmas that you've all been told...

Hey ladies and gent(s), I'm back with another NOTD! I've been in the Christmas-y mood lately, and that part of me came up with this nail look. I didn't even realize it totally looked like a coke can until like a day later. Coca Cola was the first product to merchandise Santa Clause's image, so it still rather fits the theme! (: Check it out...


I really like the outcome of this look, it's kind of my trademark style with the colour blocking and the white lines again, but much more festive :D

Wednesday 23 November 2011

Festive NOTD;; Gilded Gradient Tips! ♥♥

Hey ladies and gents! In honour of the Christmas season rapidly descending upon us and the chill that's filling the air with anticipation of snow (that's actually going to stick around), I decided to break out one of my latest nail polish purchase for a fancy, festive nail look! Check it out:


I love this style, it's elegant, warm and sophisticated, yet it's really simple to do. Not as jazzy as my nails usually become by the time I'm done with them, but still dynamic in its simplicity. I'd say in real life the gold on the tips is quite a bit more prominent than in the photo.

Sunday 20 November 2011

Spread the Love Sundays! Blog of the Week;; Prettymaking! ♥♥

Hey all! In this blogging community, I think it's very important that we work with each other and share around some of the blogs that we truly enjoy reading. How else do we get to know about new people, right?

I've thus decided to create my first regular weekly blog post, Spread the Love Sundays, where I'll feature one beauty blogger a week that I love! This week, I'll be featuring...

Mandy from Prettymaking.com!
(Picture taken from her FOTD post, November 1st)


Friday 18 November 2011

New Hair, New You! ♥♥

I love getting a new hairstyle. It's almost like you're shedding that time with your old hair, like you're moving ahead with life and taking a new step that's different and exciting. My brother's girlfriend, Bex, is an amazing stylist and colorist... With her help yesterday, she gave me the perfect chocolate-cherry (thank you, Diane, for the apt description!) that I've been looking for for years, as well as a cut that looks good now, and I can tell, will look good later.

Look ma, it's red! =D

Monday 14 November 2011

NOTD;; Frosty Tips! First Snow Inspired Gradient Nails! ♥♥

Hey gorgeous, how've you been?

It snowed for the first time this week in my town! I was so excited because it meant I got to wear my NEW BOOTS (Check out my first haul video if you wanna see them, they're beauties!), and it gave me a wonderful inspiration to do this gradient nail look! Check it out! (:


I'm really pleased with the outcome, even though the snow on the ground has already melted (typical), I've got snow on my nails!

Sunday 13 November 2011

Logos are for Billboards;; My Opinion on Fashion Branding.

This is just my opinion, you guys feel free to wear whatever you love.


(Something I drew a few years back, kind of the inspiration for this post)

If you go to your local mall, movie theatre, restaurant, high schools or what have you, chances are 7 out of 10 are wearing clothing that has evident branding displayed right across their chest. This is a subject I feel very strongly about. To me, this is just ridiculous. I'm not a billboard, I've purchased items of clothing to create my own look, not to advertise Hollister's. 

Monday 7 November 2011

NOTD;; When in Doubt... Polka Dots! ♥♥

This nail featured a lot of trial and error, but through perseverance and experimentation I have created what I feel is a great look! Check it out:


I love this colour combination, the purple and the orange really contrast and make each other look brighter.

Friday 4 November 2011

NOTD;; Fuschocking! ♥♥

Hey all! Sorry for that disappearing act there. 
In case you didn't notice, I'm a magician.
But anyhow.

I'm back, with another NOTD! This time I wanted to do something that's become kind of a signature nail look of mine, two or three tones with white line detailing. I really like this colour combination, as well as the placement of the lines. Check it out!


Sunday 23 October 2011

Birthday NOTD;; Sparkle Attack!! ♥♥

So I needed something extra special and (obviously) super sparkly on my nails for my birthday, I mean, those spider nails just wouldn`t do! So this is what I came up with... which is nearly impossible to get an accurate picture of:


Birthday Blog! ♥♥

So my birthday is October 25th, but that's a Tuesday this year, and who in their right minds parties on a Tuesday? So we had a celebration yesterday, on Saturday the 22nd. I decided to throw a hat themed party! Deal was, you need to wear a hat, dress accordingly, and come and have a good time. I made my hat myelf, and I'm so proud! Check out my pride and joy!


(Note: All this glitter is held on with nail polish and hairspray! The power of beauty!!)


I'M
 A
UNICORN! :D

Thursday 20 October 2011

Halloween NOTD;; Webbed Fingers! ♥♥

Yaaaaay, Halloween! This is my favourite holiday! You can be whatever you want, why wouldn't it be?

Now I wanted to do an NOTD the was Halloween inspired, but i wanted it to be a little more demure and not so.. cutesy, I guess? Kinda classy, but still festive. This is what I came up with!


I like the juxtaposition of the white against the black, and it creates more focus on the webbed nail, in my opinion. Here's the breakdown!

-OPI Natural Nail Base Coat
-Sally Hansen's Xtreme Wear Polish in Black Out (2 coats)
-Sally Hansen's Xtreme Wear Polish in White On (2 coats)
-Orly Instant Artist nail polish in Jet Black for the webs
-Sally Hansen's New Lengths Ceramics Clear nail polish (1 coat, web nails)
-Revlon Extra Life No Chip Top Coat (1 coat, all nails)

I got a little tricksy with this one's top coat, because my revlon extra life always streaks out my nail art. After researching online, I found a lot of people saying that Sally Hansen`s top coats were really good at preventing streaking. And my research was correct! I did a coat of the Sally Hansen polish on top of the spider webs, then one of Revlon`s Extra Life.I'm very pleased, the test run of this nail was all streaky and not nearly as good as this one. Happy Dylan! (:

Thank you guys for reading all the way up to the end of this video, I love you forever for doing so!
Be sure to follow this page and check out my facebook and youtube pages as well!

Much love!
Dylan ♥♥

Sunday 16 October 2011

I LOVE Sunglasses! ♥♥

((Disclaimer: I'm not trying to show off how many sunglasses I have or flaunt it at you guys or anything, I just really wanted to share my love of sunglasses!))

A lot of people regard sunglasses solely as a necessity, but I love that you can exude an entirely different demeanor solely based on your choice of sunglasses. I mean, if you think about it, every style of eye wear almost has its own personality, from the Paris Hilton bitch goggles, to the suave Audrey Hepburn cat eye lenses, the Kanye stunner shades, right down to the terminator glasses.

Iconic peeper protectors like these have inspired so much individuality in the eye wear department, how could you not have two million pairs by now? I've got a bit of a collection going... this is a bit of a sample =P


 Not to mention, bitch goggles are amazing for keeping the wind off of half my face on those long winter walks. I could probably go skiing in those babies. I think it's really fun to finish an outfit off, right down to the eyewear. I'm just really glad I don't need glasses so I can rock all these puppies.

So tell me, how do you switch it up? Or do you switch it up at all? Let me know in the comments! Thanks for stopping by, be sure to follow, check out my facebook and my youtube too, while you're at it! :D I have a new video up all about scarves for fall, you should check it out!

Much love comin your way!
Dylan ♥♥

Friday 14 October 2011

My Poor Laptop! ):

Hey everyone, I must take a moment to apologize for the lack of posts and videos lately. There is some kind of issue with my laptop where my WLAN won't boot up, and when it does it's only momentarily, so it's near impossible to upload videos, of which I have two to put up.

I took it into Future Shop, and they told me it was eithr my software or my hardware, but either way they have to wipe my computer. Now I haven't backed up ANYTHING, I have no way of doing so, except for my friend's external hard drive that I'm borrowing come tomorrow. Not so pleased.

Rest assured, one video will be up tonight, and that I'm not going anywhere =P

Much love!
Dylan ♥♥

Monday 10 October 2011

Halloween NOTD;; Medusa Inspired Nails! ♥♥


So we all know the Greek myth of Medusa the Gorgon, snakes for hair, one look at her and you turn to stone. For your Halloween viewing pleasure, I've done a Medusa inspired nail art that is relatively simple and very dynamic.
 STUNNING, even! :D :D :D
(more like punning, even...)
It's my second successful frankenpolish, layering two polishes to make one AMAZING colour. Check it out!


I can't get over how amazing this frankenpolish turned out! I used the criss-crossed dark blood red lines to kind of communicate a snakeskin pattern, and I think the base colour is a serviceable reptilian tone.
Here's the breakdown:

-NYC Quick Dry nail polish in Flat Iron Green (base green)
-OPI Nail Polish in It's My Year (top layer)
-SILKline Nail Art Pen in Blood Red (no actual name, just the colour)
-Revlon Extra Life No Chip Top Coat

The combination of Flat Iron Green and It's My Year is so amazing... it`s totally captivating to the eye, and much more interesting than the original colours. Here are the two bottles:


As you can see, the base coat of green COMPLETELY changes the colour of It`s My Year, taking it from a purpley-gold foil to this crazy colour business that I`m having a hard time describing. It`s almost antique-ish, but it has an edge to it with the dark red lines, which I think is very Medusa-appropriate, as well as great for fall.


Thanks so much for reading, hope you like this as much as I do! (:


Much love,
Dylan ♥♥

Friday 7 October 2011

Decrease Your Creasing;; How I Rock My Shadows All Day Long! ♥♥

If you haven't, check out my video I did on this subject:


Hi guys! Today I'm gonna go over how I stop my shadows from creasing on a day to day basis. I have pretty oily lids and I need good coverage, not an easy combination. This is how I achieve my fully covered, unfaltering eye look!

1;; Priming the Eye

Priming your lid (and under eye, if you're like me) provides a good base for applying eye shadows, which is monumental to keeping it from going all over the place. I use Urban Decay's Primer Potion in Eden daily, it's a nude matte based primer that provides me with a good base and a good amount of coverage to begin with. You only need a small amount of these products- if you use too much, it will only make your shadows crease faster.

2;; A Little More Base


This step helps to create a sticky base for the eye shadows to really grab onto. For this, you can use a small amount of concealer, foundation, or a cream shadow. Due to my oily lids, I stay away from concealers and cream shadows usually, unless I'm using a lot of powders over top to set it. I use foundation, since it's thinner it works with my eye shape a little better without creasing. In the video I used Annabelle's SkinTrue foundation in Natural Ivory.

3;; Ready, Set, Go!


Setting liquid and cream based products with a powder is essential. In this video, I used my MAC Mineralized Skin Finish Natural face powder in Medium. By putting this nude tone powder all over my eye, it helps to keep everything in place, and also makes blending shadows over top much easier, since we're putting powder on top of powder, and not powder on top of liquid or cream.


4;; Layer Up Those Shadows!

Layering your shadows creates more dimension in a look, but it also helps to work the product into the eye and keep it from slipping all over the place.


5;; Setting Sprays


Setting sprays can be used all over the face to help not only reduce the chances of fading and slipping, but to counteract any powdery, cakey appearances that we may have made by using a lot of powders. I use Urban Decay's All Nighter Setting Spray. After that dries, you're ready to mascara up and run out the door for that 8 hour shift!


So I hope this information helped out some of you, I had a few people asking me about this subject so I hope I've cleared a few things up for you! Best of luck!

Much love,
Dylan ♥♥

Wednesday 5 October 2011

NOTD;; Impactful Simplicity ♥♥

Hey guys, it's been a while! Sorry, it's been a tough week, but I'm back!

Sometimes, when you do nail art all the time, you're used to seeing so much action on your nails, that a simple style like coloured tips  is all you need to keep you satisfied.

...Okay, so I left all of my favourite nail polishes at my friend's place and had limited supplies. =P But my previous statement still stands! This ruby-tipped silver nail really worked for me, I like the classy look to it. It's a perfect way to include some fall colours into your look, while remaining fresh and chic. Check it out!


Love it, right? Here's the breakdown:

-OPI Natural Nail Base Coat
-Rimmel 60 Seconds polish in Silver Bullet (base, 2 coats)
-Revlon nail polish in Get Reddy (tips, 2 coats)
-Revlon Extra Life No Chip Top Coat

I really like this combination, I think if I were to take my white orly instant artist script brush polish to the silver part in some manner it really would have amped it up (:

Thanks so much for reading, I'm definitely going to be doing some non-NOTD posts quite shortly!
Ne sure to check out my youtube, facebook, and tumblr if you like! (:

Much love,
Dylan ♥♥

Thursday 29 September 2011

NOTD;; Arrowheads and Fairy Dust! ♥♥

Hey guys! I did a redo of my popular arrowhead nails from way back in July, but I put a few twists on them, because I'm not one to repeat myself (: Check it out!


I did the glitter on my pointer finger for a youtube video that's uploading while I type this, and I couldn't bring myself to take it off lol! Here's the breakdown:

- OPI Nail Polish in Pamplona Purple
- Orly Instant Artist Nail Polish in Crisp White
- Pointer finger - Coastal Scents glitter in 004 Fairy Dust

I WISH this glitter would show up as amazing as it is in real life, but alas, my camera is old and lame. It's a white base with rainbow glitter. You'll just have to trust me when I say it's SUPER glittery and gorgeous!

Thanks for checking in ladies and gent(s), be sure to follow, like my facebook and check out my youtube videos!

Much love!
Dylan ♥♥

Wednesday 28 September 2011

Let's Play Dressup! It's Halloween Time! ♥♥

What will YOU be for Halloween?

Me, I've got two costumes planned, one made already, one I need to go shopping for.

The one costume I've made is going to be Dr. Jekyll and Mr. Hyde. I made my jacket, vest, cravat, and altered a pair of pants.  I wish I had taken pictures, but it is already on display at work (I work in a fabric store, we have the option of making displays once a month that we get to keep). The entire costume is half and half, split right down the middle, makeup, nails, hair and all! I plan on making a makeup and nail tutorial for this, it's gonna be pretty intense. 


My second costume is a collaboration with my dear friend, Becky. I'm going to be Duckie, and she's going to be Andie, from Pretty in Pink. If you don't know this movie, you need to look into the Rat Pack already, it's a classic. I'm so, so excited for this! The hard part will be finding the iconic Duckie shoes...

Awesome, right? I think I'm going to take a pair of white slip ons and just draw things on them to make them look Duckie-esque. I am on a budget you know! =P


So tell me, what are YOU going to be? Scary witch doctor? Sailor Moon? Murderous clown? The possibilities are endless! Let me know in the comments and leave a picture if you can, I'd love to see! Thanks for reading, be sure to follow and subscribe to my youtube channel for upcoming halloween tutorials!


Much love and Duckie sunglasses!!

Dylan ♥♥


BIG EDIT::


I never posted a picture of my halloween costume on my blog! I totally blanked. Here's a redemption shot... I only ended up doing the Jekyll and Hyde costume,  and it was a little bit slapdash because I had to go to work, but here you go:

There you go! Sweet Redemption! Loveyoubye! ♥♥

Friday 23 September 2011

NOTD;; Thunderstruck feat. SUPER Glitter!! ♥♥

So a while back I did a big order from Coastal Scents, in which I purchased two jars of glitter, in silver holographic, one "fairy dust" (white with rainbow reflects), and since buying them I haven't used them at all! Figuring that that simply wouldn't do, I decided to take action. Here's the action I took!


I can't believe how glittery and easy the pointer finger is!
Really fun, I don't know that I've ever rocked a two tone line like that before, but I really enjoy it (: Here's the breakdown!

From left to right:

-OPI Natural Nail Base Coat
-Sally Hansen's Xtreme Wear Nail Colour in #370 Black Out
-Silkline Nail Art Polish in Yellow (No specific name)
-OPI Instant Artist Nail Polish in Crisp White
-Revlon Extra Life No Chip Top Coat
-Coastal Scents Silver Hologram Glitter Powder (1 oz jar)

For the glitter nail, all I did was swipe a quick base coat on my nails and dip them in the jar of glitter. It is messy, and you will have to tap off some excess glitter, but it's so worth the trouble. Once it was set I put 3 good coats of top coat (well spaced out over a good amount of time), but only on the glitter nail. I did so because I wanted a smoother texture and extra shine to the glitter.

I mean, look at this thing! That's no base colour, just a clear coat underneath, dipping my nail in the glitter ONCE.


AMAZING outcome, I can't wait to try the fairy dust! And this glitter is cosmetic safe as well, so you can use it on your face without worrying, you just need a sticky base.

Thanks so much for reading guys, be sure to follow for more fun times, and check out my youtube, facebook and other social outlets!

Much love!

Dylan ♥♥

Monday 19 September 2011

Tattoos are Beauty Too! ♥♥

What do you guys think about body art? Tattoos, piercings, the lot. I think it's a wonderful medium in which to express oneself, but a lot of people think they're a waste of money, or that you'll never love one forever, so on, so forth.

I think that as long as a tattoo means something to you, it's definitely alright to get it done. Personally, I wouldn't want to get a big skull on my chest or and tribal designs on me, because they don't mean anything to me like mine do. If a tattoo means something to you that is important and relevant to your personality, then you'll never not like your piece of art.


Here's my back piece, I must say I'm in love with it in no less of a way than I did when I got it. I got the fairy first when I was younger, I think 17, and the rest done earlier this year.


I got this tattoo because filigrees are kind of my calling card, that and zebra print. I draw them everywhere, put them in so many designs, and find myself doodling curlies all the time, so why not get it tattooed on me? Plus, tiger lilies are my favourite flower. They're so strong and vibrant.


Now if you've watched closely in my videos, seen in my pictures or know me in real life, I also have six piercings on my ears, three each, and I plan on getting at least three more. I find piercings are even less to worry about than tattoos, because they can be taken out!

So what's your body art story? Do you have any? What do they mean to you? Would you ever have them taken off or covered? Tell us what you've got in the comments!

Thanks so much for reading, be sure to comment, follow, like my facebook and subscribe to my youtube!

Much love!

Dylan ♥♥

Sunday 18 September 2011

NOTD;; Fierce Fuschias, and New Tumblr Account!! ♥♥

Hey ladies and gent(s)!

So yesterday I did that post about the dupes... today I took those nails up a notch! =P Check em out!


This was mainly just me playing around, no specific theme here (:
Now before you ask, yes, these are the same nails I used to swatch the two different colours, and I'm lazy, so I just went over the swatches. On the two left are Pulsating, and the two right are Flashbulb Fuschia. They're so close that yes, there's a bit of a difference, but I'm not too worried about it lol!
Here's the breakdown:

-OPI Natural Nail Base Coat
-Rimmel 60 Seconds Nail Polish in Pulsating (left) OPI Nail Polish in Flashbulb Fuschia (right)
-Rimmel 60 Seconds Nail Polish in Night Before
-Orly Instant Artist Nail Polish in Crisp White
-Revlon Extra Life No Chip Top Coat

I love bright colours like this on my nails, it makes me feel so empowered!

I also wanted to mention that I've started up a Tumblr account, after much convincing! Be sure to check me out there and follow so I can be on your feed there! (Also my Facebook, Youtube and Beautylish!  :P)


Thanks so much for reading, have a fiercely fuschia kinda day!

Much love!
Dylan ♥♥

Saturday 17 September 2011

*DUPE ALERT!* OPI Flashbulb Fuschia and Rimmel 60 Seconds Pulsating! ♥♥

Hey guys! This dupe is practically bang on, and it's gonna save you some moola too! You can't lose!

I first bought Rimmel 60 Seconds nail polish in Pulsating because it was on sale and it was totally gorgeous. A few weeks later, my friend Donna gave me OPI's Flashbulb Fuschia because she had accidentally bought two or something like that, which I'm always up for! =P I took Flashbulb Fuschia home to my collection so it could make some friends, and I found that I already had its twin! Check it out!


Okay, so they're more like sisters. There are some slight differences to these polishes, but they're still extremely similar. OPI's Flashbulb Fuschia, in the light, is a little darker in tone than Pulsating, and Pulsating has more of a purple shine to it. When these polishes are in the shade, however, they're dead ringers for each other. Here's the swatch, without flash:

Left two nails are Rimmel 60 Seconds polish in Pulsating
Right two nails are OPI's Flashbulb Fuschia

And here's the swatch with flash:

Personally I like Pulsating better, just because its more dynamic with the bluish tint to it. They are both definitely gorgeous, but since Rimmel 60 seconds is about half the price of OPI polishes, I think it's definitely the winner of this dupe-off!

Thanks so much for reading, be sure to subscribe to my youtube, follow this channel and like my facebook for more fun stuff! Here's to fun fall fuschias and alliteration!

Much love,

Dylan ♥♥

Wednesday 14 September 2011

Rivu of the Day;; Calling All Canadians! Annabelle SkinTrue Foundation ♥♥


I found out about this amazing foundation through MissCaseyB, a fellow Canadian on youtube. As soon as I saw the coverage it was giving her and her comments on it, I simply had to try it out. Since purchasing, I don't think I've used another foundation more than once or twice... this stuff really works, it's ridiculous.

So What's the Deal, Dylan?

Annabelle SkinTrue Foundation describes itself as a natural lightweight makeup that provides uniform coverage with a no-makeup feel. It has a matte finish which I love, is oil free which I love even more, fragrance free, and non-comedogenic, which I don't believe from any foundation. I purchased the shade Natural Ivory, which is a perfect match for me.

Judging a Book by its Cover

The packaging is a simple squeeze bottle, quite possibly my favourite type of packaging for foundations, because you can easily control the amount you want and it is very sanitary. The cap is also very sturdy, and clicks on firmly.

Facetime

When I first purchased this foundation, I was just using my fingers to blend it around my face, which worked just fine and blended out nicely. Since then I've turned to using a duo fibre brush, and holy crap guys, it's amazing. I just dot it around my face in the areas I most want to cover, then blend it all out. The duo fibre blends it out lightly, so it keeps the coverage in the spots you've placed it, but also delivers tone and coverage to wherever you blend it out.  This foundation boasts uniform coverage, and it totally delivers. I can even use it layered over itself for more coverage, in place of a concealer.

Wear and Tear

Used in conjunction with a primer (I use Benefit That Gal) and set with MAC Mineralized Skin Finish Natural, this foundation provides coverage and smooth looking skin for a good 8-10 hours with minimal touch ups.

Any Cons?

The smell, for one. Since it's an unscented product (Which is a pro, I feel like scented products are just putting more unneeded stuff on my skin), so it does have a bit of a makeup-y smell to it, but you don't smell it once it's on. 

The one other thing I'm not a big fan of is the colour selection. They only have 5 shades, the darkest of which is more of a tan colour. Not that great for makeup artists, but I bought three shades for my kit because I really like this product and I have a lot of white models =P


So that's it for this review! Hope it helped some of you lovely Canadians out there decide whether or not you'd like this foundation. Thanks so much for reading, please follow, subscribe to my youtube, and like on facebook for more fun stuff! :D have a fabulous day!

Much love!
Dylan  ♥♥

Sunday 11 September 2011

NOTD;; Fall Trends Inspired Nails! ♥♥

Hey guys! So after doing that little mini series on fall trends, I couldn't help it, and I went to the mall and picked myself up a brand new crimson red nail polish. Of course, I needed to use it straight away, so here's what I came up with!


I must say I'm a fan of the dark reds! The newest one is the lighter red used as the base. Unfortunately it's hard to tell the true appearance of the colour.. but if you need you can check out my fall nail trends blog post to see the actual nail polish. I was a little tied up trying to get shots of the detail work on the gold... But it's whatever! Here's the breakdown! (:

-Revlon nail polish in Get Reddy (lighter red base)
-Silkline nail polish, unnamed, but dark, bloody red
-OPI's Rising Star (Gold, from Burlesque collection)
-Revlon Extra Life No Chip Top Coat
-OPI Drip Dry


They almost remind me of Christmas, oddly enough! 
But let's not get ahead of ourselves, I'm still shocked it's September.

Thanks for tuning in ladies, and what few gents may come! Be sure to tune in for more awesome beauty related fun times!

Lotsa love comin your way! 

Dylan ♥♥

Rivu of the Day;; Estee Lauder Double Wear ShadowCreme! ♥♥

I purchased this product a while back at my EL counter when they were having one of those spend-this-much-and-you-get-free-stuff promotions, and I must say I don't miss the money I spent on this product at all. I purchased the colour Pink Pearl, and champagne pink colour with a frosty finish. Unfortunately I don't think this colour is available anymore, but the product definitely still is! Check it out:


Packaging

The packaging of this product is fabulous, quite plainly put. It's got a thick glass jar, which is great for keeping the product from drying out. The lid is plastic on the inside and some kind of metallic finish on the outside, but upon holding it you can tell that it's good and sturdy, and it screws on tightly. On top of looking chic, this packaging passes my expectations.


Application

Applying this product is so quick and simple. You don't even have to set it with anything! Putting it on, it is very easy to keep it a sheer wash, or amp it up by doing a few thin layers for a more intense colour. You just have to make sure your edges are well blended, because there is not a lot of work time before it sets. Combining this product with shadows is also very nice- you can use it as a base under a shadow for more colour payoff, or just use it on the lid with a different crease colour. Used as a sheer wash, I suspect this colour might be very nice for a highlight as well.


Lasting Power

This product boasts "double wear", which I have no clue what they're getting at with that, but man, this stuff has some serious staying power to it. Once it dries, it will not budge, smudge or fudge up your other makeup, and the colour stays strong all day long!  I've worn this for an eight hour shift, so with that on top of my half hour walk to and from work, I'm pleased to say that this creme shadow didn't up and quit on me by lunch.


So overall, I freakin love this stuff! I've never been super big into creme... anything, really, I've always stuck with liquids and powders, but the stuff is really starting to grow on me... I think I might have to invest in a little "research"! ;D
Thank you guys so much for reading, be sure to comment, follow and check out my youtube channel and facebook! 


Lots of love comin your way!
Dylan ♥♥

Friday 2 September 2011

NOTD;; Robot... Music... Nails? ♥♥

Okay, so a week or so ago, I picked up Sally Hansen's Celeb City nail polish, which is a super metallic silver, like, holy-crap-my-nails-are-made-of-metal silver. whenever I look at it all I can think of is robots. It's awesome. SO I decided to do a robot inspired nail.. but whenever people look at it, they see a music note! Here, take a look:


When I was doing the nail art I was looking at this from my perspective, so the lines did not look like a music note, just like, data, matrix-like line patterns. Now I see what they're getting at, but if you're an artist of any kind you'll know, it's kind of disheartening when people don't read your inspiration they way you meant to communicate it. But it's okay! when I showed people I hadn't added the white dots on the tips yet, and I think now it looks much more robot-like than it did before. Still music-y though. (: Here's the breakdown:

-Rimmel 60 seconds polish in Grey Matter as a base colour
-1 coat of Sally Hansen's polish in 220 Celeb City
-2 coats on the side of ORLY's Lunar Eclipse
-ORLY's Instant Artist nail polish in Jet Black
-ORLY's Instant Artist nail polish in Crisp White
-2 coats Revlon Extra Life No Chip Top Coat
-OPI Drip Dry (Which I'm nearly out of! D: )

I'm really pleased with these nails! hey're super shiny and lots of fun to wear. Thanks so much for reading you guys! Be sure to follow and subscribe to my youtube channel for lots more fun with beauty!

Lots of love comin your way!

Dylan ♥♥

Beauty Trends for Fall: Style Edition! ♥♥

Hiya there! This blog post is gonna be the last and final installment of beauty Trends for Fall, the style edition. Fall is my favourite dressing season, you have so many options to work with that you can really get creative! Now, I`m not saying you totally need to revamp your wardrobe to work these trends completely. Personally, I like to shop for some key pieces to add to my wardrobe so that I can be on trend, but still have my own style. Let`s get started, shall we?


Yes, Sir!

One of the first, and biggest trends for fall 2011 is the military trend. We've been seeing this in for quite a while now, and it's still around! It kind of speaks to the androgynous trend as well by giving strong shoulders and masculine aspects to an outfit. This sargeant pepper style jacket is from Balmain.


Going Tubing

Last fall and winter we saw a lot of infinity scarves, the long tubes that you can wrap around and around and get a million different looks from. This year, we're seeing the same, but smaller! The funnel scarf is a small tube that you can just throw over your head for a collar style look. This design, from Rodarte, is a loose knit, which is also very hot for fall.


Moss-t Have

Another thing we'll be seeing quite a bit of is mossy greens. This picture, designs by Philip Lim , feature two pieces in a kelly, almost khaki green. If you're feeling bold you could do a jacket or dress in this colour, or if you just want a splash of colour, you could try out a purse, belt or shoes in this colour.


Bloody Brilliant

One of the biggest colours going this year is crimson. This design, by Gucci, is done head to toe in fall's biggest colour. Of course this is not quite ready-to-wear, but the colour is spot on. This colour works so well on most skin tones, and is a great toned down alternative to bright, summery reds.


Moto-Chic

Ugh, leather. How I love you. Leather is a HUGE trend this fall, quite often seen combined with lace and metal hardware, giving almost a fetish look. I'm DYING to own this jacket from Danier leather!


Going Rogue

And last but not least, the tribal print trend is super fun, eye catching and a great way to spice up basics and create a statement look. This top is from Simons. Give it a go on bangles, big earrings, or if you're feeling adventurous, harem pants! Why not?


So that's it for my trends forecasting, I hope this little mini series has educated you a little bit on Fall 2011 style! I'm really excited to try and work some of these into my wardrobe. 

Thanks a million for reading, be sure to follow and subscribe to my youtube channel!

Lots of love comin your way!

Dylan ♥♥